Basically, If you own a E-series Falcon and like to rag it then you are bound to run into the famous blown headgasket. It is their primary weakness. Not to worry though, because changing one isn't that difficult, AND if you change it properly then you aren't likely to have to do it again. Alloy head's on iron blocks are commonly prone to this problem due to the different rates of temperature expansion etc. Some coolent passages on Fords big six are also quite close to the bore which doesn't help things..
Luckily enough its not that difficult job, if you take it to a mechanic, it's probably going to cost about $1000 or so. Not to mention the extra stuff they decide to fix, and usually they wouldn't do as good job as you can do yourself as it is purely labour intensive. They aren't going to spend an hour cleaning
the surface of the block etc, and you'll have a blown gasket again within 6 months.
When my 330,000 92 Fairmont started drinking lots of water and steaming it out the rear end I knew the gasket had finally given up. Also, the previous owner hadn't looked after the cooling system either as it was full of rusty shit. This is another leading cause of E-Series gasket failures.
The first and most important thing to do is to buy the headgaket set. You must use an FORD FALCON AU HEADGASKET The metal shim type. You must also use BRAND NEW FORD FALCON AU HEADBOLTS. The AU gasket solves all the problems as it is made of metal shims, the bolts are 'torque to yeild' and can only be used once. Don't reuse your old ones. Both of these are a must, no exceptions unless you enjoy being a cheapskate and want to be doing this all again in 6 months. The other bonus is that the AU gaket is thinner and raises up your compression a little, same as 40tho off the head, not much, but still a bonus for extra power. If you live in New Zealand, you may have called up Ford and asked them for a price on these parts.. $650??! WTF. I have no idea why it is so expensive here. Simply look on www.ebay.com.au and suss out one of the many online shops there and order the parts from Australia. I got the gakset and the bolts for $200 landed at my door.
Right now that I've ranted about that, remove the bonnet, flush the cooling system out and lets get started..
So the manual says to remove the intake plenum.. screw that? Why would you remove the intake?? Especially as mine is dual-fuel it has a lot of crazy lpg attachments that I don't wanna muck with.
So.. forget the manual like all real men should.
Simply unbolt the intake, unbolt the exhaust and pull them to the side as far as pos.. as you can see with the intake.. only about 10mm from the head but thats fine.
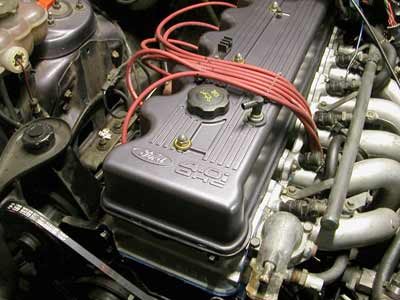
Name the sparkplug leads 1-6 for easy replacement and remove them from the plugs and tuck them to the side. Drain the coolant, and remove all connections to the head. Where there are wires or tubes, just label them so you know where they go back to. Remove the rocker cover...
Now, unbolt the rocker assembly and lift off carefully and put it aside. Hold it at either end and the entire assembly can slide and come apart. Underneath this is the camshaft. Some say to rotate the engine to TDC first to ensure that the timing isn't out when you start it. I didn't do this.. but as long as you don't rotate the engine, move the cam sproket or anything then everything stays as it was.
The power steering pump needs to be unbolted and can be sat aside in the engine bay.
Release the timing chain tensioner.
This is done by unscrewing the plug nut behind the p/steer pump you just removed. A small tube filter thing comes out with a washer and O rings. Then insert a 3mm allenkey into the hole and you can unwind the tensioner, about 3/4 of a turn ought to do it. Now you should be able to lift the sproket off the camshaft. cable-tie the cam chain to the sproket as in the photo. This will ensure that the timing remains un-changed. Unbolt the main sproket making sure the cam does not move. To do this place a large screwdriver through the sproket onto the head to lock the engine from turning. Remove the rubber half circle gasket so you can access the bolt.
Now, you must remove the headbolts. They are a size 14 sproket.
Forget using your mums tool set. You will break em. I broke
3x 14 sockets trying to get the bolts out before accepting it and
going out and buying a Impact Socket Sz. 14 Yeah it's $20.. buy it.
You need to unbolt the head in the correct sprial sequence. The back of the headgakset set you bought should have it should you want to check. However, this is for putting the head on and you are removing it, so work backwards through the sequence sprialing into the centre. Also, don't undo each bolt all the way. Rather, undo them a bit at a time. These measures ensure that the soft alloy head won't get warped by the presssures put on them from the bolts.
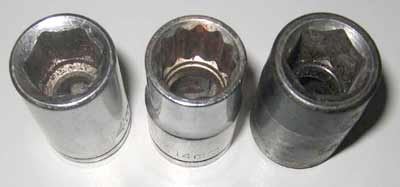
Far left is your common hex.. it will break. I broke 5 of them. The middle one is a double hex.. I had an expensive Stahlwillie set... it won't break, but it will just round off your headbolt! Last one for the win. Impact socket + power bar + extension on my powerbar = removed bolts.
Now, get a mate and lift the head off. It may need the seal broken with a few swift shots with a rubber mallet. Get a mate to take one end and lift if over the cam sproket. MAKE SURE, you clear it propery. The sproket it held up by a plastic tensioner which is brittle and can snap if you are not careful. Also, if you bump the spoket off this then you are going to mess up your timing! It's not hard, just lift it out and over..
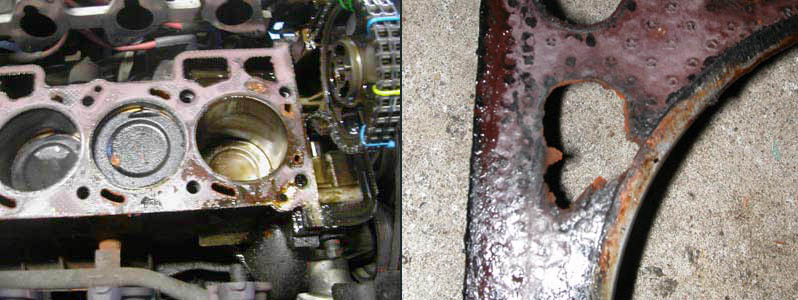
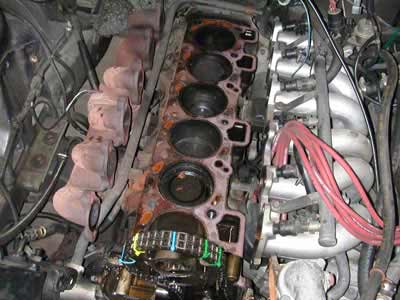
And there we are, a blown headgasket. No.1 bore and No.6 bore are the most common ones. Here is No.1 in it's watery glory. Photo two shows just how close the water passage is to the bore.. A bit of corrsion is all it took. So use corrision inhibiter with your coolant people!!
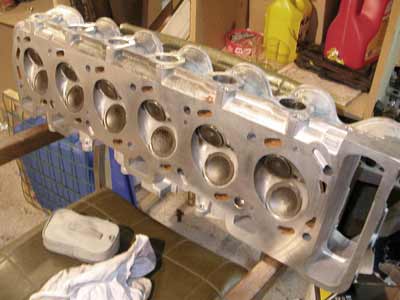
Now, you will see your head is a mess, clean it up. Get it crack tested. There is no point in waisting all this time only to find out your head is cracked later on. E-series heads are cheap, so you can replace yours if it's stuffed. I choose to completely stip mine and get it cleaned, crack-tested and skimmed flat.
THIS IS A MUST
Since I can never put anything back standard, I got the head ported as well for some extra flow.
The E-series heads are quite a nice setup from factory but the short side radius can take a tickle.
And finally a valve seat job just to be sure.
Here is the crap part. Removing the old gasket from your block has probably left bits of shit. You must remove all traces of the old gasket. Use 'Gasket Remover' spray and a scraper. You can use a soft wire brush on your drill and take care.
DON'T USE A CHISEL OR A SCREWDRIVER OR A GRINDER!!
When most of the peices are gone, lightly sand with some 1200 grit
to remove all the remaining bits. It's a painful task but you have to have the block surface completely FLAT. Finally, rub down with meths, keep doing it until the rag you are using no longer comes up black. Take your time with this, Since my head was now in getting cleaned and skimmed I had plenty of time to prep the block surface.
Now for the head bolt holes. Grab one of your old bolts and using a dremil disc cut two grooves down the thread. Alternatively you can use a thread tap of the same size. I choose to use the bolts. The groove cleans out the treads from all the crap left in them so that you get a accurate torque reading.
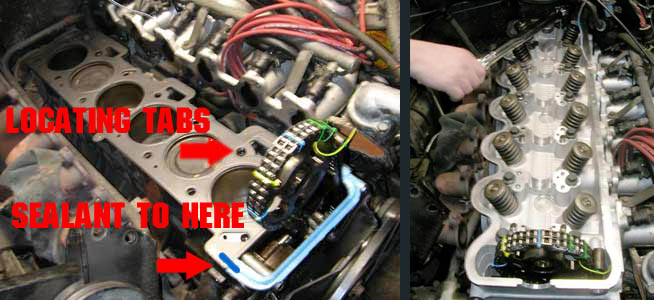
Finally, you have your head, you have cleaned your block, you have checked that it is flat using a flat-edge? Ya? good. Cleaned the hole threads? wiped down the head surface with meths? Having everything clean and flat is imperitive. Don't forget the timing cover and cleaning out the gasket notches. Now put a layer of RTV silicone sealant on the timing cover and back onto the block. This is a prone area of leakage and the gasket doesn't always seal here on an old engine. Carefully place the timing cover gasket on making sure it locates in those notches. Now place the new AU gasket down on the block using the locating inserts you would have removed earlier. Now smear some more RTV over the timing cover gasket crossing back over just onto the headgasket as in the photo.
Get you mate back and carefully lower the head back down over the cam sproket. Get your bolts..my manual said to loctite the bolts. DON'T DO THIS. However, make sure you do put some oil underneath the headbolt washes. This is so they do not grip onto your head and give you false torque readings. Now tighten them all up with your fingers. Get your torque wrench. Tighten to the correct sequence and follow these specs.
Stage1 40nm
Stage2 80nm
Stage3 110nm
Do Not use the old tension + degrees method. Use these specs and your gasket will never leak again. These the the specs Jay's RPD and Jim Mock Motorsports use.
Now with this done you can relax with a cold beer. You are almost there. Afterwards you can place the cam in. I chose to update mine with a Kelford Camtech high performance camshaft. Sit it in there with the locating tab lining up with the sproket.Very carefully pull the sproket back over the cam. Move the cam.. NOT the sproket (the cable ties will still be on.) It is quite difficult but its possible to pull it back on and tap it into place. Put the screwdriver through the sproket as before but on the right hand side. Put the sproket bolt in and tighten to 30nm. Don't forget the tensioner either, 3mm allen, tighten it back up and check that the chain is tensioned on the right hand side. Don't forget the filter tube thingy and the plug... it will need some RTV silicon on it first so that it doesn't leak oil.
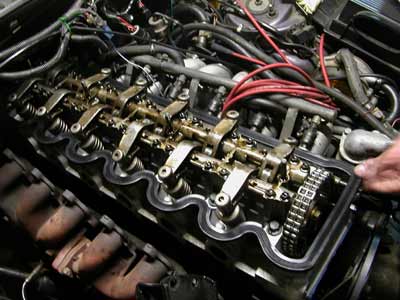
Pick up your cam gear and place it over the cam. Make sure you hold it altogether as it can fall apart on you! Thats it, just like the photo. Shuffle it into place and put in the bolts that you nicely put aside earlier.
I over tightened mine and broke off a little peice of the cam gear so be careful. 25nm is all they require.
Some will tell you to remove the lash adjusters etc and put shims in if you have a re-grind. I didn't and it's fine.. I suppose if you weren't a bogan you might thing it's a little tappety but meh.... up to you.
You can remove the cable ties now.. take your time an be careful not to drop bits down the hole we like to call.. 'The Ford Abyss.' Drop a cable tie down there and your fuct.
Place on the beautiful rubber gasket.. what a nice item eh? Put cover on.
Bolt up your exhaust manifold and heave up your inlet manifold, thermostat housing etc. CONGRATULATIONS, you are done. Fill up your engine with coolant, hopefully you cleaned out your radiator, and will make sure your cooling system is kept nice and clean with anti-freeze with corrosion inhibiter. Your headgaket will hopefully never blow again.
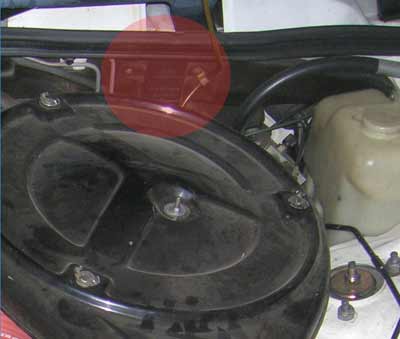
One more thing I would mention. Because the intake manifold was shunted aside etc it had pulled off the vacume line to the map sensor. The little black box in the pic. This caused all sorts of rough running and billowing black smoke.. I thought the computer was re-setting itself or something and took me a while to realise the rubber vacume line and simple been pulled of.