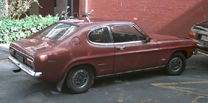
History of my Capri
It's a 1971 Aussie built Capri. It started life powered with a 1600 ohv Kent 4 cylinder and a 4 speed close ratio GT gearbox. Canterbury is flat and the roads are straight and after the abuse of 6000 rpms for long stretches the rings gave up….. this was a good excuse to out a 2L in.
With a minor exhaust drama I put the 2L in myself. I brought a head that had a hot cam, shaved to raise CR and was supposed to be ported but it wasn't. I got the carb tuned and some extractors. It liked to rev but it was a pig around town and had to be in 3rd at 50 kmph. Then the gummint decided to take the lead out of the petrol and due to the high compression it just detonated all the time I had to pull a heap of timing which made it flat then an inlet valve burnt out…..
so I fixed it and started researching about the American 2.3L turbo Lima engine which look the same as the 2L but isn't.
Turbo carb'ed engine
So I rung around to see if I could get one here in NZ sadly they are rare here but I did find a turbo'ed 2L at a wreckers in Auckland.The guy assured me that the engine was in good running order I told him that it better be as I can't see it before buying it….
It turned up and I swapped it in at a friends house as I didn't have a garage at the time. It was a blow through setup using a carb from a supercharged Lancia with an aftermarket cast iron exhaust manifold and an IHI RHB6 turbo. I turned the key she fired up and I was off for my first turbo test drive. It was disappointing in a word, made about the same power as the worked NA engine and was leaking petrol!

I took it to Peak Performance to have a look at it. Long story short the fuel bowl on the carb had at least 4 hair line cracks and the turbo compressor wheel had 4mm clearance to the housing. I rung the wreckers they dicked me around. PK and Frog converted it to a suck through system running a 2 inch SU and I took the wreckers to court and got back the money it cost me for PK and Frog to fix things.

I'll never forget the first drive under turbo power it felt like a rocket ship when the boost kicked in! The factory 8 inch clutch wasn't so happy and was completely fried 4 days after I had picked up the car. That's when the 5 speed and 9 inch clutch went in. The SU was far from ideal and being so far up the front of the engine bay it used to freeze in cold weather. After a year of abuse the turbo died….

Fuel Injected
Luckily I had got my hands on Frogs old injection manifold, it was a modified Toyota manifold cut and shut to fit the Ford head with an adapter plate. Because I already had the manifold and a primitive injection computer (more like a digital carb)
I took the turbo setup off and put the EFI on. This only took a day and in hind sight was one of the smoother conversions I've done. The end result was that it was way down on power but had far better manners than the SU carb.

Supercharged
About this time I met Rick Diehl who's an old Petrol Head from way back and with some horse trading he agreed to make me a bracket to drop the alternator down so that I could fit a SC-14 blower from a Toyota 1G-GZE. Rick did this with the turbo exhaust manifold on the dummy block.

Yes, the plan was to turbo and supercharge! I really liked the blower setup it made the car feel like a bigger displacement engine not a boosted engine. Have a look at the dyno graph, that's a stock standard 2L from a Sierra with 180,000 k's on the clock with a blower bolted to it running at 6psi.
.jpg)
I would have run more boost but the water pump pulley was in the way and this limited the size of the crank pulley.

Project Super Turbo
At this time I was car pooling with Andy Dieh (Rick's son) and I had picked up a Mitsubishi Evo 5 turbo, running factory boost they make 280 HP on the Mitsi 2L engine. Andy said that since it was a split scroll turbo we(meaning him…. and I get the coffee) make a new exhaust manifold to pair up cylinders 1 & 4, 2 & 3 to make use of the pulse energy.

So we (ie Andy) made up the manifold, I did a lot of the grinding to get the angles right but Andy did the lions share of the construction. Thanks yet again to PK and Frog and a bit of trading I had a set of Cosworth Rods and Pistons, unfortunately the piston were std size and I was having a hard time finding a block to put them in. After a year of measuring many blocks Andy talked me in to flagging the project and dropping in another engine....

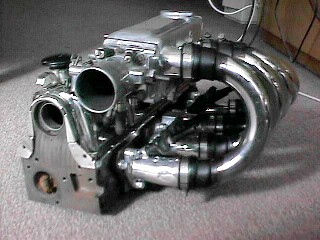
Nissan VG30-DET
After selling all my 2L related parts I found a Nissan VG30-DET that had no electric's, no fly wheel and had been sitting for 8 years. I got this delivered to my door for $1250. For those that don't know the VG-30DET is a 3L, 24 valve, quad cam (with variable cam timing), turbo engine.
It's completely over engineered, all the main caps are a one piece laddered/girdled setup, there's oil squirters for cooling the piston and it's coil on plug. I think it has every possible technology that was out there at the time.

This is when the Capri went from daily driver project car to completely nuts project car as I had a new job with a car allowance. I went and brought a Nissan Silvia (S13) Turbo 1.8L engine producing 184HP from the factory, LSD and speed dependent power steering. Which I cained for 3 years then replaced with a V8 Falky Panel Van....
I'm starting with the single turbo even tho I have the factory twin turbo setup from a 300zx because one manifold needs some modifying to fit as the exhaust side of the head is a bit different…why I have no idea as the rest of the engines are exactly the same. The turbo hits the steering and I need to remote the oil filter. The Turbo is a T3 .68AR Exhaust from a VG30-ET (the single cam VG) and the compressor is a large-ish T04.
This is how the engine turned up with all the factory plumming...
Body
I stripped her back to a shell, everything has come out, I stripped the entire underneath of the car back to metal, metal prepped, then a coat of POR13 followed by underseal. 
Glen Walters made the roll cage. It's a 6 point with dash and side intrusion bars. The Wilwood pedal box mounts run off the dash bar. Glen also mounted the seats while he was there. 
Here's the Racetech seats 
Dash
Well this was actually easier than I expected. Partly because of the design of the dash as it's flat so a flat piece of 4mm MDF did the trick ....that said the main reason it was so easy was because my friend Nick made it for me ;-) He profiled the back board, marked and cut the holes for the gauges I just made the desions of what was going where and paid for lunch.

That said I did mark and drill the holes for the O2 display myself. I decided to go with LED's mounted to the dash because I couldn't find an O2 that would tie in with the Dolphin gauges.
