Turbocharging Fords 2L OHC - Part 1
First of all this is only my experience with custom turbo charging the 2L. Therefore this is only the way I chose to do it. Others might have different opinions and fair enough cos I don't claim to be an authority in the matter. Turbocharging the 2L isn't as hard as you'd think but it does have its complications. Lots of people helped me so I hope writting this helps someone else. Honestly you spend more time driving back and forth buying parts and bits than you do in the garage fitting them!
The best thing to decide is what you want your car for. No point in saying you want a fast car cos this could mean anything. It pays to be specific as it will change the way you design your system. I wanted a fast street car that's quick of the line with instant throttle response. Top end power didn't concern me. Plus it had to fit to a budget, I couldn't afford to go spastic for every drop of hp I could get. I wanted about 200hp and for about $3000. I also wanted to do it using the 2L ford OHC just to be different.
200hp is possible on the Pinto with n/a but it takes a lot to get there. Big cam, twin 45carbs, massive headwork, pretty much everything. It could end up costing $8000 and I would have to rev the nuts off it to get there. Everyone knows that revs kill engines and once something finally went I would be in for another expensive rebuild. Plus it would be an annoying car to drive on the street with big cam and uneconomical carbs that need to be tuned every couple of months. So the n/a 2L was out. (Read David Vizhard's book 'How to modify Ford SOHC engines' to find out exactly what is possible with the n/a 2L.)
V6 was possible. It would be a cheap swap for my Capri. But 160hp was about it without again getting into all the prob's mentioned with the n/a 2L.
Now before you decided anything do a full check of your engine. I got all my system together before realising my engine was down in compression in no.3 cylinder and having to do it all over again. If you were going to do a rebuild it might pay to tune in the EFI on another engine cos the last thing you want to do is lean out your new engine and fry it. In other words, if you can afford a decent rebuild with forged pistons then do it, I guarantee you'll do this eventually so you may as well do it now. If not, as in my case, then just make sure you're engines good compression evenly throughout the cyclinders. Eitherway, if you're going to tune up EFI, then do it on a old engine first, even if it's fuked. Tuning up a computer on a brandnew engine isn't really a good idea if you can avoid it. Much better to get the computer nicely tuned up so that the new engine is brought to life as comfortably as possible :)
Do some research, talk to people. This is why I've written all this shit. Without the help of several people along the way I would probably never had accomplished my goal. I learn't heaps and made some great mates in the process. I seriously recommend aquiring a copy of 'Maximum Boost: Designing, Testing, and Installing Turbocharger Systems'
by Corky Bell available from Amazon books for $24.47. It has all the important information on designing a turbo system to suit your wants and needs.
Ok. So this is what I did. I brought a turbo manifold and a Garret t25. The manifold is a factory item. There's a few of them floating around. If you can't find one then get one made. Wouldn't cost as much as you think depending on who you're asking. The turbo would make instant response with no lag.
Turbo's make LOTs of heat. A bigger radiator was needed. I brought a 3core rad. From the wreckers off a 2.5L Triumph. They're known to be a good radiator. I fitted that with some brackets that I made up. However in retrospect if you get a nice slimline electric fan and pay good attention to maximising airflow a smaller radiator is fine. I've ended up changing my radiator to a 3L capri item since. Then I brought a VR4 intercooler. Cooling the intake charge is very important if you don't plan on dropping much compression. Because I couldn't afford to buy forged pistons and drop the compression getting a decent intercooler was imperative to save my ass. So I made up brackets to hold the intercooler in place and had them welded to the 'cooler and bolted to the body. Now you know where the pipes from the turbo to the intercooler are going to go. So you can start slicing holes where it needs to go. I used an angle grinder and cut away sections for the intercooler pipes. Hole cutting attachments for a drill would have been better. I also widened the factory air vent holes in the front to aid airflow to the 'cooler. As the bumper was going to block air I decided to slice it into quarter bumpers, I was quite hesitant because I knew I could stuff the crome and ruin my nice bumper. I marked carefully the line I was to cut, wrapped each side of this line with thick insulation tape many times and used a cold wet rag wrapped over the side I wanted to keep. This saved the crome perfectly and with a nice rubber edging you can't tell I cut them. I get people asking where I got quarterbumpers for a capri and are surprised when I said I cut them.
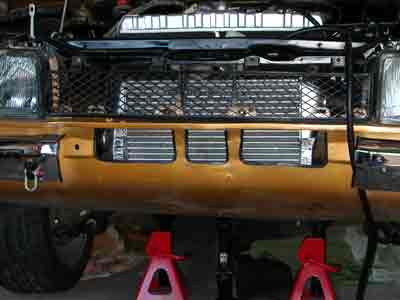
>Here is the intercooler mounted in the front. Notice the sliced bumper and widened air holes.
Now I started the intake. I brought a Mazda 1600DOHC turbo manifold. I took the throttlebody, injectors and MAP sensor off and binned the rest. I don't necessarly recommend these injectors... get ones of a 2L turbo engine perferably, this was just available to me at the time. The injectors were sent off to be cleaned and flow tested. You don't want to cut corners as this could cause many hassles later on. My friend, Jack, measured up how much room I had beside my engine for the manifold. Leaving room to get down the side we made the intake runners as long as possible. (Long runners for bottom end power, short for top end) The plenum was going to be as big as possible for the same reason, acting like a surge tank for compressed air. Jack made most of the intake manifold. But basically the original carb manifold was cut where it bolts to the engine to use as a template. This template was then roughly cut out of alloy and shaped up later with a file. The runners were 3mm alloy pipe. Cut to length they were spot welded to the plate cut from the template. This was done while bolted to a thick piece of steel to avoid warping under the heat. V-shaped cut outs were then made into the runners for the injectors. A plate of alloy would be welded into the v-shaped cut with holes drilled through them for the injectors to sit in. Large holes were drilled through the side of the plenum for the runners and they were welded on. A thick plate was welded to the back end of the plenum with holes drilled into the back for hose attachments. These were drilled and tapped into the alloy, boost gauge, wastgate actuator pipe, brakebooster line, MAP sensor, etc. The front of the plenum had a plate made up for the throttlebody to bold to. An L piece of alloy pipe was welded underneath for the waterhose. Careful when choosing the angle and length of this bit as it's easy to forget things that will be in the way such as the engine oil/air pvc unit. Lastly the entire manifold is seam welded by a professional alloy welder. Then we porting up the runners smoothing all the joins and ridding the injector rail of as much obstruction inside as possible so only a nice little bit hangs into the runner with the injector nib showing. A bracket welded on the side for the throttle cable. Lastly the face of the manifold that bolts to the engine was machined completely flat as it has warped fractionally in the welding process. Finally I took the manifold to a petrol station with a steam cleaner and gave it the biggest blasting possible to rid of all the metal shavings.
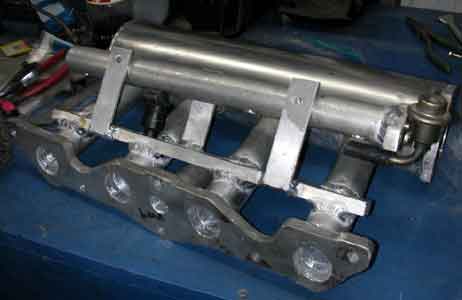
>This was the intake manifold at the porting stage. Notice the round fuelrail, this would be replaced very soon! Now this intake manifold could be bolted to the engine. Then came the piping. I brought a lot of alloy piping from the metal wrecker where there's heaps of nice alloy pipe cheap if you can be bothered hunting around. Jack whipped up the pipe work in sections spot welding as he went. They could be seam welded later. Care was made to make the flow as direct as possible with as few bends as possible. Meanwhile I busied myself with the ignition. You want to fit an electronic ignition. '88 '89 Serrias provide a straight replacement. However as my computer was going to control the ignition timing it had to be 'locked.' This involves taking apart the dizzy and ripping all the guts out that have weights and springs etc in them. Some metal putty sealant was used to lock the gaps inside the diz to stop it from being able to move. The computer would take care of that and we couldn't have the dizzy doing its own thing. The original throttle cable was too short so I sourced a mk1 Capri cable which is surprisingly long. I had a new inner made up for this with the correct tab on the end to pull the throttlebody. At this time I sourced a T-piece to fit the block where the oil pressure gauge runs for the oil feed for the turbo. Make sure its a good fit or oil will piss everywhere and your turbo will die quickly.
Some say only use silicon rubber joins. Good idea but its expensive. I used truck radiator hosing and spent the saving on decent wide bolting clamps. I wouldn't use regular hose clamps as they're usually crap and cut into the rubber.
From here everything was bolted up and all the pipework put in place. Now I brought a early programmable LINK computer. If you can afford a newer one then sweet as but most of the old ones can do all the important stuff just a bit harder to tune.. My friend did most of the wiring. I had removed the battery to the boot with a massive cable taking the current up to the engine bay. Make sure you use rubber grommets through the firewall. It pays to sort out all the firewall holes while the engines out and you can get to them easy. Once through the firewall the cable goes into a mounted wiring block and then to the starter motor.
I brought a wiring loom from LINK to suit my computer then it was basically a matter of connecting the colour coded wires as the diagram displayed. Quite easy really just like connecting a stereo. Just take your time to solder each wire properly and use shrink wrap where applicable. Wiring is definitely not the place to rush and cut corners if you want your car to be reliable. My friend Simon showed me how to to the wiring. Make sure you have a decent ground wire to the battery and to the engine. Drill a hole through the body and sand back to bare metal. Put a bolt and a large washer through and use this as the ground with the correct wire hoop connection. Use wire as large as possible. The LINK doesn't like a weak earth and will cause hassles if you don't get this right. We found that my car was earthing up the braded water hose and through a small bracket rather than the ground wire cos I hadn't provided a decent wire and ground point! Carefully lay out the wires for the injector plugs and solder each point properly. Shrink wrap joins followed by decent insulation tape round all the wires and finally capped with plastic wire tube. BUY new injector plugs! We wasted heaps of time fluffy round with injector hassles trying to use the old plugs. Even though they looked ok and connected there's no room for leeway with the injector plug wire. It has to be perfect, so save yourself time and fork out for brand new plugs. I brought Bosch ones from LINK that were $20 each! But probably the best improvement expenditure of the whole system.
Now while all the wiring was underway I fixed up the fuel lines. EFI needs two lines one in and one out. You might find your tank doesn't have a return fuel line. I found my Capri drop tank had two breathers and I used one of them and it was sweet as. Most people say you need a surge tank. I good idea if you could afford it. I couldn't. Furthermore there are laws about bringing fuel into the car that has an external tank, especially with a hatchback, there also wasn't really a suitable place to put one. You can take your tank apart if you want and weld in baffles to act like a surge tank. I'm pretty sure my Capri already has them but I don't corner hard if I'm low and always make sure I have at least ¼ gas. No problems to date. In fact I've had it going sideways on empty without surging! Fuel line was EFI rated 8mm hose. Clamped under the left sill every 30cm. As it had to cross the exhaust at one point I made an effort to tie up as far away as possible and wrap that bit of exhaust with exhaust heat wrap. After trying to use a 2nd hand fuel electric fuel pump and having it crap out I brought a brand new 400hp Bosch fuel pump mounted up under the diff arch. I used a pre filter from the tank to the pump as the pump will crap out if it gets shit in it. I also used a EFI rated filter up at the engine to save the injectors from the same fate. The pump is run by the LINK on a relay so it primes the engine with fuel when to turn the key, I also added an inline fuse for safety. It was about here that I towed the car to the exhaust shop to have a dump pipe made up for the turbo & join to my 21/5 system. I used a flange to join them so they can be easily taken apart and a m18 nut welded in with a hole for an o2 sensor.
.jpg)
>Here is the pump mounted under the car and the bottom pic show the return line.
Now the first time I fired up the system the fuel rail leaked like a garden sprinkler! I binned the fuel rail and had a new one made up out of proper fuel rail alloy. You can buy it by the metre and cut it to whatever length you need. It has the right flat edges to seal the injectors properly. Make sure you drill the holes the right size so the injectors just fit. File the edges of the holes and grease them up before pushing the injectors in otherwise it might cut the rubber grommet at the tip ruining the seal. The other thing I will mention at this stage is the coil choice. I had a brand new Bosch GT coil. It was crap. I have heard from many people who have had similar problems with this coil and I am surprised they are still making it. Save yourself a lot of time and hassle by forking out for a decent coil. I brough a MSD Blaster which provided a spark you could weld with! The improvment was huge.
From here it was all set for the LINK to be tuned. Because it was an old model I had to be driving the car to be able to tune each zone. An o2 sensor checked the richness of the fuel as we drove up and down a country road tuning in the zones. The car ran 12psi on standard internals. However I had realised eariler my old 2L wasn't the best of health. It was down in compression in one of the cylinders. So it wasn't long before it was blowing blue smoke everywhere. No problem really as I had planned to setup the system on my stock 2L and drive it round for a year while I built up a stronger one as a replacement. This is an excellent idea as it gives you a chance to tune up the computer and drive the car while the rebuilt is underway. Only because my original 2L was poked I had to do the rebuilt almost straight away. Not over a year! This also killed my chance of getting forged pistons as I hadn't budgetted for them so soon. But they could wait.
So I had to do a rebuild. Using the original engine had provided the chance to tune the LINK nicely so it would be setup properly when I put in the fresh engine.
I sourced a 205 engine from a 89 Serria that looked to be in good cond. I chose the 205 as it has apparently thicker cylinder walls, stronger conrods and is supposed to be a little stronger throughout. Make sure if you get a 205 that it has 205 written at the top on both sides as this is apparently the blocks chosen for the Cosworth series and have all the nice bits. We took the head off before buying it and checked the condition of the pistons and the bores for wear and found it to be good. Previously we had taken the heads of 8 engines at the wreckers looking for a suitable block to rebuild. All of them had scoring in the bores, detonation on the pistons etc etc. Anyway we found one privately. The block was sent off to be rebuilt. Meanwhile Simon worked the head. Fitted a mild FL14 Kent cam to open up the top end a little, heavy-duty valve springs, and hardened valve seats for unleaded. We ported and polished the head and took out some metal from the combustion chamber to lower the compression a little. While all this was happening I had the turbo rebuilt with new seals.
All this was bolted up to the fresh block and fitted my heavy-duty clutch and lightened flywheel. This was all put back in the car and started up. Engines are the tightest when they are fresh. The starter motor gave up trying to start it and we ended up tow starting it into life. As soon as it started we drove it up and down the road working the rev range to bed the pistons to the bores.
The car was still smoking, not blue smoke anymore but grey turbo smoke. Thinking that the guy who rebuilt it had stiffed me I was worried. After investigation it turns out that there's supposed to be a 1.8mm restriction in the oil feed. We found this out by asking someone familiar with CA18DET engines which is what the turbo is out of. So it might pay for you to do the same. A carb jet provided a perfect restrictor in the oil feed line. This cured the smoke problem.
Upon dyno tuning the car we make 145hp at the rear wheels, and 187ft pounds of torque from 2800rpm. This is around 105kw@wheels and 250nm torque. Not bad for a car that only weighs 1000kgs. With the addition of forged pistons and a t3 turbo 200hp at the rear wheels is easily achievable.
1. Check the condition of your engine first! Then you know if you need to budget for a rebuild or not.
2. Take your time with the wiring carefully soldering each join properly.
3. Buy new injector plugs!
4. Buy a decent coil. Not the Bosch GT series as they are crap. MSD Blaster is a good choice.
5. Make a really decent earth to your engine with a bolt and washer through the guard and again for the battery.
6. Lock your dizzy.
7. Make a bung to seal up the hole for original fuel pump or it will pour oil everywhere.
8. Don't skimp on a decent intercooler.
9. Use decent bolt type clamps for your hoses.
10. Make the piping simple with a little bends as possible.
11. Don't forget to measure the intake manifold properly as your go taking note of things to obstruct such as the oil/air separator unit and the dizzy cap. And leave a decent gap before the guard so you can reach the oil filter, wiring etc. oh and leave a decent gap at the back for the hose tails for boost gauges, MAP sensors etc etc.
12. Buy a decent new fuel pump.
13. Buy proper fuel rail piping for the fuel rail.
14. Use a oil restrictor for the turbo!
Thanks to:
Jack deReeper, Simon Quested, Andrew Diehl, Craig Flewellen, Blackwood motors
For part two including dyno results: http://www.retrotech.co.nz/Projects/turbo-pinto-part-2.php